(Adding categories) Tag: categoryselect |
mNo edit summary |
||
| (47 intermediate revisions by 14 users not shown) | |||
| Line 1: | Line 1: | ||
| − | {{Wikialink|legends-of-the-hidden-temple|Legends of the Hidden Temple Wiki}} |
+ | {{Wikialink-show|legends-of-the-hidden-temple|Legends of the Hidden Temple Wiki}} |
| − | {{Infobox television |
+ | {{Infobox television show |
| title = Legends of the Hidden Temple |
| title = Legends of the Hidden Temple |
||
| image = Legends of the Hidden Temple logo.jpg |
| image = Legends of the Hidden Temple logo.jpg |
||
| − | | genre = Children's |
+ | | genre = Children's game show |
| created = David G. Stanley<br />Scott A. Stone<br />Stephen Brown |
| created = David G. Stanley<br />Scott A. Stone<br />Stephen Brown |
||
| − | | starring = [[Kirk Fogg]]<br />Dee Baker as Olmec |
+ | | starring = [[Kirk Fogg]]<br />[[Dee Bradley Baker]] as Olmec |
| country = USA |
| country = USA |
||
| + | | episodes = [[Legends of the Hidden Temple episode list|120]] |
||
| − | | no_episodes = 120 |
||
| runtime = 30 Minutes |
| runtime = 30 Minutes |
||
| − | | network = [[Nickelodeon]] |
||
| first_aired = {{start date|1993|9|11}} |
| first_aired = {{start date|1993|9|11}} |
||
| − | | last_aired = {{end date|1995| |
+ | | last_aired = {{end date|1995|11|24}} |
| nick_name = |
| nick_name = |
||
| imdb_id = |
| imdb_id = |
||
| tv_com_id = |
| tv_com_id = |
||
| + | }} |
||
| − | |Picture Format = |
||
| + | {{Dablink|the game show|the made-for-TV movie adaptation|[[Legends of the Hidden Temple (TV movie)]]}} |
||
| − | }}'''''Legends of the Hidden Temple''''' (sometimes shortened to LOTHT) is an action-adventure game show for children. The show centers around a "temple" that is "filled with lost treasures protected by mysterious Mayan temple guards". [[Kirk Fogg]] hosts and serves as the teams' guide, while [[Dee Bradley Baker]] announces and voices a talking audio-animatronic Olmec head who "knows the secrets behind each of the treasures in his Temple". Six teams of two children, one boy and one girl, compete to retrieve one of the historical artifacts in the Temple by performing physical stunts and answering questions based on history, mythology, and geography. After three elimination rounds, only one team remains, who then earns the right to go through the Temple to retrieve the artifact within three minutes and win a grand prize. |
||
| + | '''''Legends of the Hidden Temple''''' (sometimes abbreviated '''LOTHT''') is an action-adventure game show for children. The show centers around a "temple" that is "filled with lost treasures protected by mysterious Mayan temple guards". [[Kirk Fogg]] hosts and serves as the teams' guide, while [[Dee Bradley Baker]] announced and voiced a talking audio-animatronic Olmec head, simply named [[Olmec]], who "knows the secrets behind each of the treasures in his Temple". Six teams of two children, one boy and one girl, compete to retrieve one of the historical artifacts in the Temple by performing physical stunts and answering questions based on history, mythology, and geography. After three elimination rounds, only one team remains, who then earns the right to go through the Temple to retrieve the artifact within three minutes and win a grand prize. |
||
| − | Legends was produced by [[Stone Stanley Productions]] in association with Nickelodeon and was taped at [[Nickelodeon Studios]] at |
+ | ''Legends'' was produced by [[Stone Stanley Productions]] in association with [[Nickelodeon]] and was taped at [[Nickelodeon Studios]] at Universal Studios in Orlando, Florida. It aired from September 11, [[1993]] to November 24, [[1995]] in first-run and through August 23, 1998 in reruns. From 1999 to 2007, reruns of the show aired on [[Nickelodeon Games and Sports for Kids|Nick GAS]]. Since 2011, it has sporadically appeared on [[TeenNick]]'s [[The '90s Are All That]] and [[NickSplat]] blocks. [[Legends of the Hidden Temple (TV movie)|A made-for-TV movie]] based on the show aired in November [[2016]], and a fictional version of the show was also featured in ''[[The Loud House]]'' episode "[[Legends]]". |
==The main game== |
==The main game== |
||
===Teams=== |
===Teams=== |
||
| − | In each game, six teams of two members each competed in three rounds to get to the temple. |
+ | In each game, six teams of two members each competed in three rounds to get to the temple. |
| − | * [[Red Jaguars|<span style="color:#FF0000">Red Jaguars</span>]] |
||
| − | * [[Blue Barracudas|<span style="color:#00BFFF">Blue Barracudas</span>]] |
||
| − | * [[Green Monkeys|<span style="color:#00FF7F">Green Monkeys</span>]] |
||
| − | * [[Orange Iguanas|<span style="color:#FF6600">Orange Iguanas</span>]] |
||
| − | * [[Purple Parrots|<span style="color:#990099">Purple Parrots</span>]] |
||
| − | * [[Silver Snakes|<span style="color:#ACACAC">Silver Snakes</span>]] |
||
| + | Each team was designated a color and animal, indicated on their uniform shirts: |
||
| − | The Green Monkeys, The Red Jaguars and The Orange Iguanas were the only team not to use the same sound twice. The color yellow was omitted because the symbols on the uniforms were already yellow (the Silver Snakes were supposed to be yellow). |
||
| + | <gallery perrow="6" widths="100" position="center" spacing="small" bordercolor="transparent" captionalign="center" hideaddbutton="true"> |
||
| + | Sticker4.png|[[Red Jaguars|<span style="color:#FF0000">Red Jaguars</span>]]|link=Red Jaguars |
||
| + | Sticker5.png|[[Blue Barracudas|<span style="color:#00BFFF">Blue Barracudas</span>]]|link=Blue Barracudas |
||
| + | Sticker6.png|[[Green Monkeys|<span style="color:#59D132">Green Monkeys</span>]]|link=Green Monkeys |
||
| + | Sticker9.png|[[Orange Iguanas|<span style="color:#FF6600">Orange Iguanas</span>]]|link=Orange Iguanas |
||
| + | Sticker7.png|[[Purple Parrots|<span style="color:#990099">Purple Parrots</span>]]|link=Purple Parrots |
||
| + | Sticker10.png|[[Silver Snakes|<span style="color:#ACACAC">Silver Snakes</span>]]|link=Silver Snakes |
||
| + | </gallery> |
||
| + | |||
| + | The Green Monkeys, Red Jaguars, and Orange Iguanas were the only teams not to use the same sound twice. The color yellow was omitted because the symbols on the uniforms were already yellow (the Silver Snakes were supposed to be yellow). |
||
===Round 1: The Moat=== |
===Round 1: The Moat=== |
||
| − | [[Image:Legends of the Hidden Temple moat.jpg| |
+ | [[Image:Legends of the Hidden Temple moat.jpg|250px|thumb|Round 1]] |
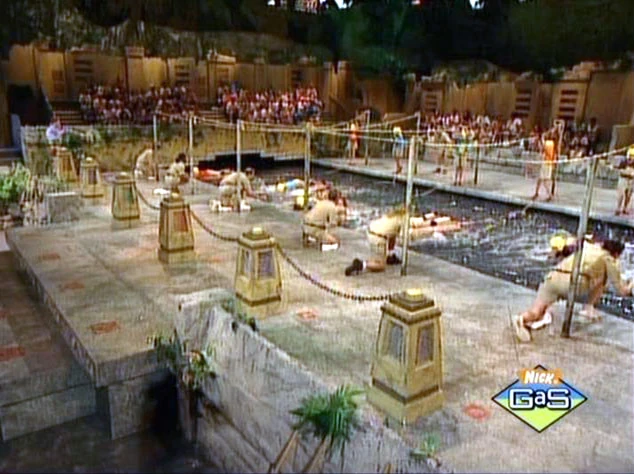
The first round of the show involved a stunt where the six teams had to get across a narrow swimming pool known as the "moat". And during the show's Nick Gas run the logo would be at the bottom right corner. Some of the commonly used methods included rafts, ropes, and bridges. All six teams attempted to get both members across according to the rules and punch a button, thus setting off the team's "gong". Typically, if a team member fell in the water, that partner (or occasionally both teammates) would have to go back and try again until they could get across. The first four teams to hit their gongs advanced to the second round. |
The first round of the show involved a stunt where the six teams had to get across a narrow swimming pool known as the "moat". And during the show's Nick Gas run the logo would be at the bottom right corner. Some of the commonly used methods included rafts, ropes, and bridges. All six teams attempted to get both members across according to the rules and punch a button, thus setting off the team's "gong". Typically, if a team member fell in the water, that partner (or occasionally both teammates) would have to go back and try again until they could get across. The first four teams to hit their gongs advanced to the second round. |
||
| − | |||
| − | [[Image:Legends of the Hidden Temple steps of knowledge.jpg|300px|right|Round 2]] |
||
===Round 2: The Steps of Knowledge=== |
===Round 2: The Steps of Knowledge=== |
||
| + | [[Image:Legends of the Hidden Temple steps of knowledge.jpg|250px|thumb|Round 2]] |
||
Olmec begun the Steps of Knowledge by telling the remaining teams the episode's legend. After finishing, he asked the teams a series of questions to test their memories. A team that knew the answer buzzed in by hitting the button (known as an "ancient marking") on their step with their feet, and their staircase lights up so they can answer (if Olmec was still in the middle of asking the question, he would stop talking immediately). Each multiple-choice question had three possible answers. If the team answered correctly, they moved down to the next level. If a team answered incorrectly or went too long without an answer (three seconds after being called upon), the other teams would have a chance to answer. A question would be replaced if two of its three choices were eliminated by incorrect answers. The first two teams to step down to the bottom level by answering questions correctly moved on to the next round. |
Olmec begun the Steps of Knowledge by telling the remaining teams the episode's legend. After finishing, he asked the teams a series of questions to test their memories. A team that knew the answer buzzed in by hitting the button (known as an "ancient marking") on their step with their feet, and their staircase lights up so they can answer (if Olmec was still in the middle of asking the question, he would stop talking immediately). Each multiple-choice question had three possible answers. If the team answered correctly, they moved down to the next level. If a team answered incorrectly or went too long without an answer (three seconds after being called upon), the other teams would have a chance to answer. A question would be replaced if two of its three choices were eliminated by incorrect answers. The first two teams to step down to the bottom level by answering questions correctly moved on to the next round. |
||
| − | |||
| − | [[Image:Temple game.jpg|300px|right|One of the temple games]] |
||
===Round 3: The Temple Games=== |
===Round 3: The Temple Games=== |
||
| + | [[Image:Temple game.jpg|250px|thumb|One of the temple games]] |
||
The Temple Games round was introduced as a turning point in the episode away from the unpredictable Moat and mind games of the Steps of Knowledge, where "the glory [went] to the fastest and the strongest." Here, the two remaining teams, most likely the Red Jaguars, Green Monkeys, or Siver Snakes, competed for as many pendants of life as possible in three physical challenges. And the Nick Gas logo would be at the upper left corner The Temple Games employed on Legends were many and varied. The first season featured more of an emphasis on teams climbing and/or crossing ramps to retrieve objects, while hindered by bungee cords attached to them. Most times the ramps were covered with soap or water to make it more difficult. The second and third seasons introduced more physical activities such as climbing, riding moving or spinning objects, or spinning a giant wheel. Temple Game challenges were either untimed or lasted for a maximum of 60 seconds (ending either when time expired or when a team completed the objective). After each challenge, the winning team (the team who completed the objective first, or, failing that, the team who made the most progress) was awarded some portion of a protective Pendant of Life. The first two challenges, which pitted a single member of a team against another, awarded a half-pendant each, and the final challenge, involving both teams in whole, awarded a full pendant. If a Temple Game ended in a tie, both teams were awarded the pendant value of that game. After these rounds, the team with the greater number of pendants went on to the final round. |
The Temple Games round was introduced as a turning point in the episode away from the unpredictable Moat and mind games of the Steps of Knowledge, where "the glory [went] to the fastest and the strongest." Here, the two remaining teams, most likely the Red Jaguars, Green Monkeys, or Siver Snakes, competed for as many pendants of life as possible in three physical challenges. And the Nick Gas logo would be at the upper left corner The Temple Games employed on Legends were many and varied. The first season featured more of an emphasis on teams climbing and/or crossing ramps to retrieve objects, while hindered by bungee cords attached to them. Most times the ramps were covered with soap or water to make it more difficult. The second and third seasons introduced more physical activities such as climbing, riding moving or spinning objects, or spinning a giant wheel. Temple Game challenges were either untimed or lasted for a maximum of 60 seconds (ending either when time expired or when a team completed the objective). After each challenge, the winning team (the team who completed the objective first, or, failing that, the team who made the most progress) was awarded some portion of a protective Pendant of Life. The first two challenges, which pitted a single member of a team against another, awarded a half-pendant each, and the final challenge, involving both teams in whole, awarded a full pendant. If a Temple Game ended in a tie, both teams were awarded the pendant value of that game. After these rounds, the team with the greater number of pendants went on to the final round. |
||
| Line 52: | Line 54: | ||
In the final round, often known as the Temple Run, the winning team took whatever Pendants of Life they had (most commonly, a full pendant and half of the second) into the temple. The temple consisted of 12 to 13 rooms, depending on the layout, each connected by a doorway which may or may not have been open during the game, depending on the setup used that day. One room in the labyrinth had the themed artifact; three rooms held [[Temple Guard]]s (spotters in lavish Mayan sentinel costumes). If the winning team had an incomplete pendant, the remaining half-pendant would be in a room as well. However, if the team had only one pendant going into the temple, there would be no hidden pendant. In that case, if the second player ran into a Guard, the game would end. |
In the final round, often known as the Temple Run, the winning team took whatever Pendants of Life they had (most commonly, a full pendant and half of the second) into the temple. The temple consisted of 12 to 13 rooms, depending on the layout, each connected by a doorway which may or may not have been open during the game, depending on the setup used that day. One room in the labyrinth had the themed artifact; three rooms held [[Temple Guard]]s (spotters in lavish Mayan sentinel costumes). If the winning team had an incomplete pendant, the remaining half-pendant would be in a room as well. However, if the team had only one pendant going into the temple, there would be no hidden pendant. In that case, if the second player ran into a Guard, the game would end. |
||
| − | The winning team had three minutes to retrieve the artifact. One player was sent in first, with a complete pendant. The second player remained outside the Temple gate to watch the first player's progress. In each room, completing a puzzle or accomplishing a task would unlock a door to another room. For example, the Shrine of the Silver Monkey held three pieces of a silver monkey statue, and completing the statue would unlock a door. The |
+ | The winning team had three minutes to retrieve the artifact. One player was sent in first, with a complete pendant. The second player remained outside the Temple gate to watch the first player's progress. In each room, completing a puzzle or accomplishing a task would unlock a door to another room. For example, the Shrine of the Silver Monkey held three pieces of a silver monkey statue, and completing the statue would unlock a door. The Jester's Court had buttons placed along the walls outlining images of two court jesters and one king. One of these sets of 3 buttons opened a door to an adjacent room; posing in the position of the correct outline and pressing the buttons opened the door. |
| − | When a player encountered one |
+ | When a player encountered one Guard, the player was forced to give up a full pendant in order to continue or if caught without a pendant be taken out of the temple. The second player now had the chance to enter, with all opened doors remaining open and all known Temple Guards nonexistent. If the second player possessed only half a Pendant of Life, a Temple Guard could catch him or her and end the game. To prevent that, the second player would also have to find the other half of the pendant which was hidden in the temple. It was often well-hidden and only a few contestants have found one during their run. |
If either player reached the artifact (being defined as actually grabbing onto the artifact, instead of merely being in the same room with it), all remaining Guards "vanished" and all locked doors instantly opened, allowing the player to escape unhindered. Just for getting into the temple, the team automatically won a prize. If they picked up the artifact, they also would win another prize of slightly higher value. If they escaped with the artifact before time ran out, the team won a vacation (sometimes to another country), or a week at NASA's Space Camp, in addition to the two merchandise prizes. (Although not disclosed in the show, each individual winning contestant would receive two travel vouchers. Destinations varied greatly—some were within the state of Florida, while others could be in the Caribbean or Mexico. Unlike previous Nick game shows, Legends never deviated from offering a travel prize as the grand prize.) |
If either player reached the artifact (being defined as actually grabbing onto the artifact, instead of merely being in the same room with it), all remaining Guards "vanished" and all locked doors instantly opened, allowing the player to escape unhindered. Just for getting into the temple, the team automatically won a prize. If they picked up the artifact, they also would win another prize of slightly higher value. If they escaped with the artifact before time ran out, the team won a vacation (sometimes to another country), or a week at NASA's Space Camp, in addition to the two merchandise prizes. (Although not disclosed in the show, each individual winning contestant would receive two travel vouchers. Destinations varied greatly—some were within the state of Florida, while others could be in the Caribbean or Mexico. Unlike previous Nick game shows, Legends never deviated from offering a travel prize as the grand prize.) |
||
| − | One interesting note is the portrayal of the Temple Run. During the first season, the Temple Run would take place with only background music similar to [[Nintendo Entertainment System|8-bit NES]] music and the clock. In the second and third seasons, the same |
+ | One interesting note is the portrayal of the Temple Run. During the first season, the Temple Run would take place with only background music similar to [[wikipedia:Nintendo Entertainment System|8-bit NES]] music and the clock. In the second and third seasons, the same music would play in the background, while the display included both a map and a count of the number of pendants the team had. This gave the Temple Run a feel somewhat similar to a live-action video game. |
| − | |||
| − | ==Temple Layouts== |
||
| − | ===Season 1=== |
||
| − | {| border="1" bordercolor="black" cellpadding="2" |
||
| − | |+(''Rooms listed starting with the upper-right room and going in a counter-clockwise direction'') |
||
| − | |- |
||
| − | ! width="88" | Layout #1 |
||
| − | ! width="88" | Layout #2 |
||
| − | ! width="88" | Layout #3 |
||
| − | ! width="88" | Layout #4 |
||
| − | ! width="88" | Layout #5 |
||
| − | ! width="88" | Layout #6 |
||
| − | ! width="88" | Layout #7 |
||
| − | ! width="88" | Layout #8 |
||
| − | ! width="88" | Layout #9 |
||
| − | |- |
||
| − | | colspan="7" | The Room of the Three Gargoyles |
||
| − | | colspan="2" | The Room of the Royal Gongs |
||
| − | |- |
||
| − | | colspan="4" | The Wall Climb |
||
| − | | colspan="5" | The Wheel Room/The Troubled Bridge |
||
| − | |- |
||
| − | | colspan="7" | The Observatory (S1, 1-7) |
||
| − | | colspan="2" | The Observatory (S1, 8-9) |
||
| − | |- |
||
| − | | colspan="8" | The Heart Room |
||
| − | | style="font-size:10px" | The Room of Fallen Columns |
||
| − | |- |
||
| − | | colspan="3" | The Room of the Golden Idols |
||
| − | | colspan="5" | The Treasure Room |
||
| − | | style="font-size:10px" | The Treasury of Golden Orbs |
||
| − | |- |
||
| − | | colspan="9" | The Shrine of the Silver Monkey |
||
| − | |- |
||
| − | | colspan="2" | The Torch Room |
||
| − | | colspan="3" | |
||
| − | The Pirate's Cove |
||
| − | | colspan="4" | The Room of the Three Torches |
||
| − | |- |
||
| − | | colspan="2" | The Mine Shaft |
||
| − | | colspan="3" | The Dungeon |
||
| − | | colspan="4" | The Well |
||
| − | |- |
||
| − | | colspan="9" | The Tomb of the Ancient Kings |
||
| − | |- |
||
| − | | The Swamp |
||
| − | | colspan="2" | The Spider's Lair |
||
| − | | colspan="2" | The Swamp |
||
| − | | style="font-size:10px" | The Bamboo Forest |
||
| − | | colspan="3" | The Holes of Python |
||
| − | |- |
||
| − | | colspan="3" | The Throne Room (S1) |
||
| − | | colspan="3" | The Room of Harmonic Convergence |
||
| − | | colspan="3" | The Throne Room (S1) |
||
| − | |- |
||
| − | | colspan="9" | The Cave of Sighs |
||
| − | |} |
||
| − | |||
| − | '''The Room of the Three Gargoyles''': |
||
| − | In this room, the player needed to push in the correct tongue of the three gargoyles to advance in the temple. |
||
| − | |||
| − | '''The Room of the Royal Gongs''': |
||
| − | In this room, the player needed to push in the correct base of the three gongs to advance in the temple. |
||
| − | |||
| − | '''The Wall Climb (The Pit of Despair)''': |
||
| − | Players have a choice of climbing the walls, or just crawling through the pit, the hit an actuator. A set of ropes were added next to each door in Layout Two to assist contestants in climbing the walls. In all three seasons, the Pit area was the only room that never had a Temple Guard |
||
| − | |||
| − | '''The Pit of Despair (The Wheel Room) / The Troubled Bridge''': |
||
| − | If the player came from the bottom, he or she was required to turn a wheel to raise a stone slab covering the door and its actuator. At the top of the room was a bridge connecting the two doors and their actuators that partitioned the room into two pieces inaccessible from one another. (It has been suggested that the wheel was also used on Double Dare's obstacle course.) |
||
| − | |||
| − | '''The Observatory (S1, 1-7)''': |
||
| − | In this room, the player needed to spin a centrally-placed sundial to open the door(s). |
||
| − | |||
| − | '''The Observatory (S1, 8-9)''': |
||
| − | In this room, the player needed to spin the central celestial lights to open the door(s). |
||
| − | |||
| − | '''The Heart Room''': |
||
| − | In this room, the player needed only to hit an actuator of the corresponding door to go through it. |
||
| − | |||
| − | '''The Room of Fallen Columns''': |
||
| − | Similar to the Heart Room, except that several large columns were strewn around the room to slow down contestants. |
||
| − | |||
| − | '''The Room of the Golden Idols''': |
||
| − | By pushing down on the base of the golden idols in the room, the downward door(s) could open. Otherwise, players only needed to hit an actuator to open its corresponding side door. |
||
| − | |||
| − | '''The Treasure Room''': |
||
| − | Players entering this room had a choice of opening the treasure chest and climbing down through it, if unlocked, or hitting actuators to open their corresponding side doors. |
||
| − | |||
| − | '''The Treasury of Golden Orbs''': |
||
| − | In this room, players needed to place a golden orb in one of three pedestals at the center of the room. If they had placed it in the correct pedestal, a door would open. |
||
| − | |||
| − | '''The Shrine of the Silver Monkey''': |
||
| − | The only room in the temple used in every layout each season; contestants were required to retrieve and correctly assemble three pieces of a monkey statue. The statue contained a base, a torso, and the head with a long vertical pole attached to it, which had to be assembled in this specific order. After assembling the statue at the front of the room and pushing it down into the podium, a door would open. While simple in concept, the task of assembling the silver monkey became the source of many failed temple attempts, as the three piece puzzle was often too complex. |
||
| − | |||
| − | '''The Pirate's Cove''': |
||
| − | After a player entered this room from the Dungeon, he or she took one of three torches placed on the outside walls of the room, and placed it in one of three torch holders at the front of the room. Placing the correct torch in the appropriate holder opened the door to the Shrine of the Silver Monkey. If the player entered from the Shrine of the Silver Monkey, he or she spun the central ship's wheel to raise a rock slab covering the ladder to the Dungeon. |
||
| − | |||
| − | '''The Torch Room/The Room of the Three Torches''': |
||
| − | Same as above, but with no ship's wheel; if the player entered from the Shrine of the Silver Monkey, he or she only needed to ride the elevator downwards into the Well or the Mine Shaft. The room was called the Torch Room in Layouts 1-2, but the Room of the Three Torches in Layouts 6-9. |
||
| − | |||
| − | '''The Mine Shaft''': |
||
| − | If the player rode the elevator down to the room, they could take the ladder up to the Shrine of the Silver Monkey, or bash through the wall and head to the Tomb of the Ancient Kings. If they entered from the Tomb of the Ancient Kings, they could ride the elevator up to the Torch Room, if available, or take the ladder up to the Shrine of the Silver Monkey. |
||
| − | |||
| − | '''The Dungeon''': |
||
| − | If the player came from the Pirates' Cove, they could take the ladder up to the Shrine of the Silver Monkey, or bash through the wall and head to the Tomb of the Ancient Kings. If they entered from the Tomb of the Ancient Kings, they could take the ladder up to the Pirate's Cove, or take the other ladder up to the Shrine of the Silver Monkey. |
||
| − | |||
| − | '''The Well''': |
||
| − | If the player rode the bucket down to the room, they could take the ladder up to the Shrine of the Silver Monkey, or bash through the wall and head to the Tomb of the Ancient Kings. If they entered from the Tomb of the Ancient Kings, they could ride the bucket up to the Room of the Three Torches, if it was available, or take the ladder up to the Shrine of the Silver Monkey. |
||
| − | |||
| − | '''The Tomb of the Ancient Kings''': |
||
| − | If the player entered this room from the Mine Shaft, the Well, or the Dungeon, they would take a key found in the coffin at the center of the room and proceed either upward or to the right. If the player entered from the right, they could either bash through the wall to go left, or find the key to go upwards into The Shrine of the Silver Monkey. |
||
| − | |||
| − | '''The Swamp''': |
||
| − | The Swamp was filled with lots of aged netting. Players hit actuators to open their corresponding doors. |
||
| − | |||
| − | '''The Spider's Lair''': |
||
| − | After the players navigated the spider web, they could hit actuators and open their corresponding doors. |
||
| − | |||
| − | '''The Bamboo Forest''': |
||
| − | The Bamboo Forest was filled with long bamboo rods. After making his or her way through the room, the player could hit an actuator and progress through one of the doors. |
||
| − | |||
| − | '''The Holes of Python''': |
||
| − | The Holes of Python, commonly referred to as "The Treacherous Holes of Python" by Olmec, featured four wooden partitions that stretched from the back of the room to the front, and each had a number of holes carved into them, and a ladder extending upwards. After crawling through the holes, the player, similarly to contestants that entered previous rooms that occupied this spot, would hit an actuator to open its corresponding door. |
||
| − | |||
| − | '''The Throne Room (S1)''': |
||
| − | In the Throne Room, the player needed to press the "Throne of the Pretender" placed at the front of the room, usually done by sitting on it, to open any doors. |
||
| − | |||
| − | '''The Room of Harmonic Convergence''': |
||
| − | In the Room of Harmonic Convergence, five red floor markings were placed around a central ladder. The player would have to press down on the correct two steps out of the five embedded in the ground to open the door(s). |
||
| − | |||
| − | '''The Cave of Sighs''': |
||
| − | The Cave of Size was a room of different ledges that the player had to navigate. After doing so, players hit actuators to exit the room by one of its three doors. |
||
| − | |||
| − | ---- |
||
| − | |||
| − | ===Season 2=== |
||
| − | {| border="1" bordercolor="black" cellpadding="2" |
||
| − | |+(''Rooms listed starting with the upper-right room and going in a counter-clockwise direction'') |
||
| − | |- |
||
| − | ! width="158" | Layout 1 |
||
| − | ! width="158" | Layout 2 |
||
| − | ! width="158" | Layout 3 |
||
| − | ! width="158" | Layout 4 |
||
| − | ! width="158" | Layout 5 |
||
| − | |- |
||
| − | | colspan="5" | The Crypt |
||
| − | |- |
||
| − | | colspan="2" | The Pit of Despair |
||
| − | | The Rock Quarry/<br />The Troubled Bridge |
||
| − | | colspan="2" | The Pit |
||
| − | |- |
||
| − | | colspan="5" | The Observatory (S2) |
||
| − | |- |
||
| − | | The Heart Room |
||
| − | | colspan="3" | Medusa's Lair |
||
| − | | The Room of the Mandarin Hand |
||
| − | |- |
||
| − | | colspan="5" | The King's Storeroom (S2) |
||
| − | |- |
||
| − | | colspan="5" | The Shrine of the Silver Monkey |
||
| − | |- |
||
| − | | colspan="2" | The Viper's Nest |
||
| − | | The Lightning Ball Room |
||
| − | | colspan="2" | The Room of the Secret Password |
||
| − | |- |
||
| − | | colspan="5" | The Mine Shaft |
||
| − | |- |
||
| − | | colspan="5" | The Dark Forest |
||
| − | |- |
||
| − | | colspan="3" | The Swamp |
||
| − | | colspan="2" | The Jester's Court |
||
| − | |- |
||
| − | | colspan="2" | The Throne Room (S2) |
||
| − | | colspan="3" | The Laser Light Room |
||
| − | |- |
||
| − | | colspan="5" | The Ledges |
||
| − | |} |
||
| − | |||
| − | '''The Crypt''': |
||
| − | Three skeletons were placed at the edges of the room, and each of them held a golden book. By pulling the correct book, a door would open but pulling any of the books would initiate a reaction from the skeletons. |
||
| − | |||
| − | '''The Pit of Despair''': |
||
| − | As the name implies, the Pit of Depair was a large pit. In this room, the player would need to climb the outer walls in order to hit one of two actuators or remain at the ground level and continue to the room on the left. |
||
| − | |||
| − | '''The Rock Quarry / The Troubled Bridge''': |
||
| − | This room was divided into two halves. When the player entered from either the Crypt or the Observatory he or she would only need to hit an actuator at the opposite side of the bridge to open the door. If the player entered from the Ledges, he or she had to place five rocks into the central bucket to lift the stone slab covering the door to the Laser Light Room. NOTE: Coincidentally, the bucket was the same used as the elevator in layouts 6 - 9 of Season 1. |
||
| − | |||
| − | '''The Pit''': |
||
| − | This room was similar to the Pit of Despair, but it had large stone slabs under the doors to the Observatory (the central room of the temple), the upper crawl tube of the Ledges, and the Crypt. The player could stay on ground level if they entered from the Ledges, or swing across the gap using the central rope if they entered from the Crypt or the upper crawl tube of the Ledges. After doing so, players hit actuators to exit the room. |
||
| − | |||
| − | '''The Observatory (S2)''': |
||
| − | The room had a large stone column at the front of the room, split into four sections, and when entire column was lined up correctly, there would be a complete picture. After completing the puzzle, the doors would open. |
||
| − | |||
| − | '''Medusa's Lair''': |
||
| − | A small "Medusa head" was placed at the front of the room. In order to open the door(s), the player had to place a number of snakes in Medusa's head. In earlier episodes, players had to put four snakes into Medusa's head, but this was later reduced to two. |
||
| − | |||
| − | '''The Room of the Mandarin Hand''': |
||
| − | A large hand was placed at the center of this room, holding a globe with its thumb. The players needed to push the fingers of the hand around the globe to open the doors. |
||
| − | |||
| − | '''The King's Storeroom (S2)''': |
||
| − | In this room, a pot was placed on each of three pedestals at the center of the room. The player entering this room needed to break open the pots in search of a key, then place the key in the correct pedestal to open the door(s). |
||
| − | |||
| − | '''The Viper's Nest''': |
||
| − | If the player took the elevator up to this room, they would need to open the three pots at the front of the room. Each contained a rubber snake, and two of them would jump out when their pots were opened. The player needed to pull the unmoving snake to open the door to the Shrine of the Silver Monkey. If they came from the Shrine, he or she could ride down in the elevator, if it was upstairs. |
||
| − | |||
| − | '''The Lightning Ball Room''': |
||
| − | The player had to connect four power cords into the pedestal holding the central "lightning ball" to "create their own lightning" and open the Shrine door. However, if they entered from the Shrine of the Silver Monkey, they could simply ride the elevator downwards. |
||
| − | |||
| − | '''The Room of the Secret Password''': |
||
| − | If the player entered from the Mine Shaft, he or she would need to open the cabinets placed on the outer walls, and shout out the inscription which was written inside the cabinet. (The three inscriptions were, "Klaatu Barada Nikto," (a reference to ''The Day the Earth Stood Still'') "Long live Olmec," and, "Open Sesame.") If it was the correct password, then the door to the right would open. If the player entered from the Shrine of the Silver Monkey, he or she would only need to ride the elevator downwards into the Mine Shaft. |
||
| − | |||
| − | '''The Mine Shaft''': |
||
| − | If the player rode the elevator down to the room, they could take the ladder up to the Shrine of the Silver Monkey or bash through the wall and head to the Dark Forest. If they entered from the Dark Forest, they could ride the elevator up to The Vipers' Nest, The Lightning Ball Room, or The Room of the Secret Password, or take the ladder up to the Shrine of the Silver Monkey. |
||
| − | |||
| − | '''The Dark Forest''': |
||
| − | This room featured two large trees with long arms and holes in their trunks. Upon entering this room from the Swamp, the Jester's Court, or the Shrine of the Silver Monkey, the player would have a choice to reach into each tree in search of a magnetic key or try and break the stone wall into the Mine Shaft. If he or she was successful in finding the key, the player needed to hit the key on a magnetic plate to allow access to the Shrine of the Silver Monkey. If the player entered this room from the Mine Shaft, he or she would still need to find the key to allow access to the next room. Players have to be very careful in this room because the trees could be "inhabited by the spirit of a Temple Guard." If this happened, the "Temple Spirit" (as Fogg sometimes called them) would grab them, and the player would have to surrender a Pendant of Life if they had one; otherwise, their turn was over. The Dark Forest took the place of the Tomb of the Ancient Kings in the Temple, but some of the objects in the room, namely the images on the golden doors behind the trees, retained their previous appearance and were never updated. |
||
| − | |||
| − | '''The Jester's Court''': |
||
| − | This room had three paintings of court jesters on the back wall, each with three actuators mounted on them. The player had to align themselves up with the figure and hit all three actuators at the same time. Doing so would make the paintings glow and the lights to turn off and a laughing noise would appear and the doors would open. |
||
| − | |||
| − | '''The Throne Room (S2)''': |
||
| − | The Throne of the Pretender was placed on a reversible wall that blocked access to the left. The players sat upon the throne and pushed down on two actuators placed on the armrests to swing around the wall, allowing access to open doors. Sometimes, Temple Guards would reach through the reversible wall and grab the player. |
||
| − | |||
| − | '''The Laser Light Room''': |
||
| − | The Laser Light Room featured the wall in the Throne Room, this time placed in the center of the room. Eight blocks were placed on this wall, and players would pull the blocks off to reveal the laser behind each. Pulling off the tile covering the white laser among the other red ones would open the doors. |
||
| − | |||
| − | '''The Ledges''': |
||
| − | This room was similar to the first season's Cave of Sighs but repainted. Players now had to enter by running up the steps past Olmec and down a slide into the room or from the Crypt. The player just needed to navigate the room and hit an actuator to open one of three doors. |
||
| − | |||
| − | ---- |
||
| − | |||
| − | ===Season 3=== |
||
| − | {| border="1" bordercolor="black" cellpadding="2" |
||
| − | |+(''Rooms listed starting with the upper-right room and going in a counter-clockwise direction'') |
||
| − | |- |
||
| − | ! width="350" | Layout 1 |
||
| − | |- |
||
| − | | The Crypt |
||
| − | |- |
||
| − | | The Pit of the Pendulum |
||
| − | |- |
||
| − | | The King's Storeroom (S3) |
||
| − | |- |
||
| − | | The Chamber of the Sacred Markers |
||
| − | |- |
||
| − | | The Room of the Ancient Warriors |
||
| − | |- |
||
| − | | The Shrine of the Silver Monkey |
||
| − | |- |
||
| − | | The Room of the Secret Password |
||
| − | |- |
||
| − | | The Pharaoh's Secret Passage |
||
| − | |- |
||
| − | | The Quicksand Bog |
||
| − | |- |
||
| − | | The Dark Forest |
||
| − | |- |
||
| − | | The Jesters' Court |
||
| − | |- |
||
| − | | The Tomb of the Headless Kings |
||
| − | |- |
||
| − | | The Ledges |
||
| − | |} |
||
| − | |||
| − | '''The Pit of the Pendulum''': |
||
| − | The Pit of the Pendulum, unlike previous rooms occupying this location, was a large pit filled with foam blocks and had a large column at the front of the pit and a rope at the back. Players knocked down the column to open the doors, always done by swinging on the rope or pushing it over with their hands. |
||
| − | |||
| − | '''The Chamber of the Sacred Markers''': |
||
| − | The Chamber of the Sacred Markers featured two long strips beside the ladder upwards and a sliding door covering the ladder. On the strips were identical sequences of markers, but the right side's had three missing. The players would need to correctly place the three missing markers on the outer walls of this room to open the doors. If, after completing this objective, the central door leading up to the King's Storeroom opened, it would sometimes reveal a Temple Guard hiding behind it. |
||
| − | |||
| − | '''The Room of the Ancient Warriors''': |
||
| − | Three sets of armor were placed at the back of the room. In here, the player needed to place him or herself into the armor and pull two levers downward. If they did so with the correct set of armor, the door would open. If a Temple Guard was in the room, he would hide behind the correct set of armor and grab the player when he or she climbed into it and completed the objective. Unlike in the first two seasons, players could no longer climb downward after completing the objective; due to space constraints, the ladder downward had been removed. |
||
| − | |||
| − | '''The Room of the Secret Password''': |
||
| − | As in Season Two, players needed to read the correct of the three password tablets placed in cabinets on the walls, but they had to complete the objective even if they came from the Shrine of the Silver Monkey. |
||
| − | |||
| − | '''The Pharaoh's Secret Passage''': |
||
| − | The Pharaoh's Secret Passage was nothing but a narrow tunnel-slide connecting the Room of the Secret Password with the Quicksand Bog. |
||
| − | |||
| − | '''The Quicksand Bog''': |
||
| − | In the Quicksand Bog, players had the option of going up into the Room of the Secret Password, up into the Shrine of the Silver Monkey, or bashing through the wall and into the Dark Forest. |
||
| − | |||
| − | '''The Jester's Court''': |
||
| − | The objective of this room is the same as what it was in Season Two, but there are no more ladders leading up to the room above, and the laughing sound is removed when the objective was completed. |
||
| − | |||
| − | '''The Tomb of the Headless Kings''': |
||
| − | Two skeletons of kings with no heads were placed at the center of the room, surrounded by vines that hung from the ceiling. In here, players needed to pull the vines to release bones, in search of the skull. After finding the skull, the players then needed to place it on the correct king to continue. Ironically, the correct king would say, "I am alive," while his glowing red hearbeat is audible and pulsating. |
||
===Team Statistics=== |
===Team Statistics=== |
||
| Line 354: | Line 69: | ||
| style="text-align:center; color:white; background:#FF0000" | '''Red Jaguars''' |
| style="text-align:center; color:white; background:#FF0000" | '''Red Jaguars''' |
||
| style="text-align:center; color:white; background:#00BFFF" | '''Blue Barracudas''' |
| style="text-align:center; color:white; background:#00BFFF" | '''Blue Barracudas''' |
||
| − | | style="text-align:center; color:white; background:# |
+ | | style="text-align:center; color:white; background:#59D132" | '''Green Monkeys''' |
| style="text-align:center; color:white; background:#FF6600" | '''Orange Iguanas''' |
| style="text-align:center; color:white; background:#FF6600" | '''Orange Iguanas''' |
||
| style="text-align:center; color:white; background:#990099" | '''Purple Parrots''' |
| style="text-align:center; color:white; background:#990099" | '''Purple Parrots''' |
||
| Line 416: | Line 131: | ||
|- |
|- |
||
! Tiebreakers Wins/Losses |
! Tiebreakers Wins/Losses |
||
| − | | 1- |
+ | | 1-3 |
| − | | |
+ | | 2-0 |
| 0 |
| 0 |
||
| 0 |
| 0 |
||
| Line 462: | Line 177: | ||
| style="text-align:center; color:white; background:#FF0000" | '''Red Jaguars''' |
| style="text-align:center; color:white; background:#FF0000" | '''Red Jaguars''' |
||
| style="text-align:center; color:white; background:#00BFFF" | '''Blue Barracudas''' |
| style="text-align:center; color:white; background:#00BFFF" | '''Blue Barracudas''' |
||
| − | | style="text-align:center; color:white; background:# |
+ | | style="text-align:center; color:white; background:#59D132" | '''Green Monkeys''' |
| style="text-align:center; color:white; background:#FF6600" | '''Orange Iguanas''' |
| style="text-align:center; color:white; background:#FF6600" | '''Orange Iguanas''' |
||
| style="text-align:center; color:white; background:#990099" | '''Purple Parrots''' |
| style="text-align:center; color:white; background:#990099" | '''Purple Parrots''' |
||
| Line 525: | Line 240: | ||
! Tiebreakers Wins/Losses |
! Tiebreakers Wins/Losses |
||
| 2-1 |
| 2-1 |
||
| − | | |
+ | | 2-0 |
| 2-1 |
| 2-1 |
||
| 3-2 |
| 3-2 |
||
| − | | 0- |
+ | | 0-5 |
| 1-1 |
| 1-1 |
||
|- |
|- |
||
| Line 541: | Line 256: | ||
! Wins |
! Wins |
||
| 0 |
| 0 |
||
| − | | |
+ | | 2 |
| 2 |
| 2 |
||
| 3 |
| 3 |
||
| Line 549: | Line 264: | ||
! Losses |
! Losses |
||
| 6 |
| 6 |
||
| − | | |
+ | | 5 |
| 3 |
| 3 |
||
| 7 |
| 7 |
||
| Line 569: | Line 284: | ||
| style="text-align:center; color:white; background:#FF0000" | '''Red Jaguars''' |
| style="text-align:center; color:white; background:#FF0000" | '''Red Jaguars''' |
||
| style="text-align:center; color:white; background:#00BFFF" | '''Blue Barracudas''' |
| style="text-align:center; color:white; background:#00BFFF" | '''Blue Barracudas''' |
||
| − | | style="text-align:center; color:white; background:# |
+ | | style="text-align:center; color:white; background:#59D132" | '''Green Monkeys''' |
| style="text-align:center; color:white; background:#FF6600" | '''Orange Iguanas''' |
| style="text-align:center; color:white; background:#FF6600" | '''Orange Iguanas''' |
||
| style="text-align:center; color:white; background:#990099" | '''Purple Parrots''' |
| style="text-align:center; color:white; background:#990099" | '''Purple Parrots''' |
||
| Line 678: | Line 393: | ||
| style="text-align:center; color:white; background:#FF0000" | '''Red Jaguars''' |
| style="text-align:center; color:white; background:#FF0000" | '''Red Jaguars''' |
||
| style="text-align:center; color:white; background:#00BFFF" | '''Blue Barracudas''' |
| style="text-align:center; color:white; background:#00BFFF" | '''Blue Barracudas''' |
||
| − | | style="text-align:center; color:white; background:# |
+ | | style="text-align:center; color:white; background:#59D132" | '''Green Monkeys''' |
| style="text-align:center; color:white; background:#FF6600" | '''Orange Iguanas''' |
| style="text-align:center; color:white; background:#FF6600" | '''Orange Iguanas''' |
||
| style="text-align:center; color:white; background:#990099" | '''Purple Parrots''' |
| style="text-align:center; color:white; background:#990099" | '''Purple Parrots''' |
||
| Line 757: | Line 472: | ||
! Wins |
! Wins |
||
| 4 |
| 4 |
||
| − | | |
+ | | 5 |
| 8 |
| 8 |
||
| 4 |
| 4 |
||
| Line 765: | Line 480: | ||
! Losses |
! Losses |
||
| 16 |
| 16 |
||
| − | | |
+ | | 14 |
| 16 |
| 16 |
||
| 21 |
| 21 |
||
| Line 789: | Line 504: | ||
===Teams=== |
===Teams=== |
||
| − | * The |
+ | * The Green Monkeys and the Silver Snakes share the record for most temple completions over the show's three seasons, both managing eight. Yet, out of the number of times going into the Temple, the Green Monkeys had a slightly better percentage (24-21). However, the Silver Snakes had the fastest contestants on the show. |
* In a points system orchestrated by a fan, an entrance to the temple was worth one point, and a temple victory was worth three points. The Green Monkeys were first with 48 points; the Silver Snakes were second with 45 points; the Orange Iguanas were third with 37 points; the Blue Barracudas were fourth with 34 points; the Red Jaguars were fifth with 32 points. Last place belongs to the Purple Parrots with 20 points. |
* In a points system orchestrated by a fan, an entrance to the temple was worth one point, and a temple victory was worth three points. The Green Monkeys were first with 48 points; the Silver Snakes were second with 45 points; the Orange Iguanas were third with 37 points; the Blue Barracudas were fourth with 34 points; the Red Jaguars were fifth with 32 points. Last place belongs to the Purple Parrots with 20 points. |
||
| − | * In Season One, the contestants wore colored |
+ | * In Season One, the contestants wore colored T-shirts tucked into khaki shorts for all rounds except the Temple Run, where they changed into T-shirts tucked into yellow sweatpants. In Seasons Two and Three, the contestants wore colored T-shirts with khaki shorts for the moat crossing and Steps of Knowledge but changed into blue jeans for the Temple Games and Temple Run. Also, the helmet color changed from yellow to gold. |
===Temple Rooms=== |
===Temple Rooms=== |
||
* The first season's temple featured nine different layouts, as rooms changed almost each day of taping; the second season's temple featured five different layouts. Only Season Three's temple never changed layouts. |
* The first season's temple featured nine different layouts, as rooms changed almost each day of taping; the second season's temple featured five different layouts. Only Season Three's temple never changed layouts. |
||
| − | * The only room in the temple that was featured in all 120 episodes was |
+ | * The only room in the temple that was featured in all 120 episodes was the Shrine of the Silver Monkey. |
* There were over 45 different rooms that were featured across the show's 120-episode span. |
* There were over 45 different rooms that were featured across the show's 120-episode span. |
||
* Not all actuators in the temple, when hit, would open doors. As temple layouts changed, many were removed from the temple or made completely inactive. This is made obvious with the corner doors between the Swamp area and the Ancient Warriors area (the areas directly right of the Shrine of the Silver Monkey and Tomb of the Ancient Kings/Dark Forest); despite their actuators being completely inactive for most of the series (and left with no way to traverse through them, besides), they were still opened with the other doors after a team grabbed the day's artifact. |
* Not all actuators in the temple, when hit, would open doors. As temple layouts changed, many were removed from the temple or made completely inactive. This is made obvious with the corner doors between the Swamp area and the Ancient Warriors area (the areas directly right of the Shrine of the Silver Monkey and Tomb of the Ancient Kings/Dark Forest); despite their actuators being completely inactive for most of the series (and left with no way to traverse through them, besides), they were still opened with the other doors after a team grabbed the day's artifact. |
||
| − | * The only two episodes where the stone wall connecting the two |
+ | * The only two episodes where the stone wall connecting the two south-westernmost rooms could not be broken were "[[The Keys to the Alhambra]]" (Episode 8) and "[[The Imperial Purple Robe of Empress Theodora]]" (Episode 49). |
* One room, The King's Storeroom, was featured at two different locations in the series. In Season Two, it was located above the Swamp/Jester's Court. In Season Three, it was moved to the Observatory. |
* One room, The King's Storeroom, was featured at two different locations in the series. In Season Two, it was located above the Swamp/Jester's Court. In Season Three, it was moved to the Observatory. |
||
===Temple Runs=== |
===Temple Runs=== |
||
| + | * Three seasons of the show aired, and 120 episodes were produced. Of those 120 episodes, only 33 episodes featured teams successfully getting out of the temple with the artifact. Seventeen episodes featured a player grabbing the artifact with time remaining but running out of time before he or she could actually bring the artifact out of the Temple, making for a total of 50 episodes in which the artifact was actually snatched up. |
||
| − | |||
| + | * The fastest completion of the Temple Run was in "[[The Mask of Shaka Zulu]]" (Episode 28). The player completed the temple in 1:46, without the help of his partner. However, this was arguably the easiest temple design; the player encountered no locked doors. This was due to a production error—the door leading from The Holes of Python to the Tomb of the Ancient Kings (where the artifact was located) was supposed to be locked. If you exclude that run the fastest completion was in "[[The Ivory Hunting Horn of Roland]]" (Episode 101) completed in 1:49. |
||
| − | |||
| + | * The quickest loss happened just 1:32 into the run in "[[Elizabeth I's Golden Ship]]" (Episode 5). The concentration of temple guards in the three rooms the team entered prevented them from going further. |
||
| − | * Three seasons of the show aired, and 120 episodes were produced. Of those 120 episodes, only 32 episodes featured teams successfully getting out of the temple with the artifact. Seventeen episodes featured a player grabbing the artifact with time remaining but running out of time before he or she could actually bring the artifact out of the Temple, making for a total of 49 episodes in which the artifact was actually snatched up. |
||
| − | * The fastest completion of the Temple Run was in "[[The Mask of Shaka Zulu]]" (Season 1, Layout 7). The player completed the temple in 1:46, without the help of his partner. However, this was arguably the easiest temple design; the player encountered no locked doors. This was due to a production error—the door leading from The Holes of Python to the Tomb of the Ancient Kings (where the artifact was located) was supposed to be locked. If you exclude that run the fastest completion was in "[[The Ivory Hunting Horn of Roland]]" (Season 3) completed in 1:49. |
||
| − | * The quickest loss happened just 1:32 into the run in "[[Elizabeth I's Golden Ship]]" (Season 1, Layout 2). The concentration of temple guards in the three rooms the team entered prevented them from going further. |
||
* Four temple runs were completed with a single second left on the clock. |
* Four temple runs were completed with a single second left on the clock. |
||
| − | * The closest failed acquisition of an artifact was in "[[The Dragon Lady and the Blue Pearl]]" ( |
+ | * The closest failed acquisition of an artifact was in "[[The Dragon Lady and the Blue Pearl]]" (Episode 33). Secondrunner, Jennifer, in this run entered the artifact's room, The Holes of Python, with 10 seconds left, and scurried past the obstacles, only to fall a finger's length short of the Pearl. |
| − | * The closest wins |
+ | * The closest wins were in "Galileo's Cannonball", "[[The Applewood Amulet of Emiliano Zapata]]." and the Milk Bucket of Fredyis" all three had one second left |
* Three temple runs involved the player who entered the temple grabbing the artifact without encountering a single temple guard. These runs were from "[[The Enormous Iron Nose Ring of Babe the Ox]]" from Season Two, and "[[The Much-Heralded Helmet of Sir Gawain]]" and "[[The Broken Trident of Poseidon]]," both from Season Three. However, only "The Enormous Iron Nose Ring" and "Much-Heralded Helmet" episodes ended with the player successfully getting out of the temple with the artifact. In the "Broken Trident" episode, the player, Kimberly, was startled by the noise of all the locked doors opening upon her grabbing the trident in the Shrine of the Silver Monkey, so she forgot she needed to get out of the temple carrying the object. Upon entering the Room of the Ancient Warriors, she put down the trident, and attempted to run out of the temple without it. Fogg then yelled for her to go back and get it. She went back to get it but went down into the Tomb of the Headless Kings through the Chamber of the Sacred Markers. Time ran out just as she entered the Ledges. |
* Three temple runs involved the player who entered the temple grabbing the artifact without encountering a single temple guard. These runs were from "[[The Enormous Iron Nose Ring of Babe the Ox]]" from Season Two, and "[[The Much-Heralded Helmet of Sir Gawain]]" and "[[The Broken Trident of Poseidon]]," both from Season Three. However, only "The Enormous Iron Nose Ring" and "Much-Heralded Helmet" episodes ended with the player successfully getting out of the temple with the artifact. In the "Broken Trident" episode, the player, Kimberly, was startled by the noise of all the locked doors opening upon her grabbing the trident in the Shrine of the Silver Monkey, so she forgot she needed to get out of the temple carrying the object. Upon entering the Room of the Ancient Warriors, she put down the trident, and attempted to run out of the temple without it. Fogg then yelled for her to go back and get it. She went back to get it but went down into the Tomb of the Headless Kings through the Chamber of the Sacred Markers. Time ran out just as she entered the Ledges. |
||
| − | * The first solo run completion occurred in "[[The Star of Sultan Saladin]]" ( |
+ | * The first solo run completion occurred in "[[The Star of Sultan Saladin]]" (Episode 7). Leah went from The Room of the Three Gargoyles to The Observatory and got out with 27 seconds left. Also, what is most widely noted is the Temple Guard in The Cave of Sighs that is spotted on the floor. Because she was on her way out of the Temple with the Star in hand, the Guard was rendered out of play. Many fans humorously commented on the Guard failing to disappear (literally). |
| + | * In the Temple Run of "[[Henry VIII's Great Seal]]" (Episode 14), one of the contestants, (the team's follow-up runner), was so startled by a temple guard's appearance that he literally ran out of the temple's cross-sectioned boundaries and onto the main studio floor. As many speculated that he was disqualified, the speculation was irrelevant considering he only possessed half of a Pendant upon encountering the Guard and was to be ejected from the temple, ending the run. |
||
| − | * The record for the fastest time by an individual took place in Season Three's "[[The Secret Map of the Bandit Queen]]" episode. It was set by [[Zac Turney]], whose episode became one of the most circulated on Nick GAS. His partner, Miriam, was taken out of the Temple in the Dark Forest with 1:17 left. He got out with 9 seconds left, a split time of 1:08, easily beating the "Mask of Shaka Zulu" episode. Turney is now an actor. In 2004, he was selected by TBS to be one of the two Gilligans on their new reality show, [[The Real Gilligan's Island]]. |
||
| + | * In "[[The Pendant of Kamehameha]]" (Episode 11), the temple guard missed his cue in the Dungeon, allowing the second contestant to plow through the wall into the Tomb of the Ancient Kings, forcing the temple guard to follow the contestant into the Tomb to capture her. |
||
| − | * In the Temple Run of "[[Henry VIII's Great Seal]]" (Season 1, Layout 4), one of the contestants, (the team's follow-up runner), was so startled by a temple guard's appearance that he literally ran out of the temple's cross-sectioned boundaries and onto the main studio floor. As many speculated that he was disqualified, the speculation was irrelevant considering he only possessed half of a Pendant upon encountering the Guard and was to be ejected from the temple, ending the run. |
||
| + | * In Season One, the hidden half-pendant is often visible at the silver monkey's base in the Shrine of the Silver Monkey, but one notable episode where it is visibly hidden elsewhere (and the only episode where Kirk announced that the player picks it up in that season) is "[[The Treasure of Anne Bonny]]" (Episode 40). |
||
| − | * In "[[The Pendant of Kamehameha]]" (Season 1, Layout 3), the temple guard missed his cue in the Dungeon, allowing the second contestant to plow through the wall into the Tomb of the Ancient Kings, forcing the temple guard to follow the contestant into the Tomb to capture her. |
||
| + | * In only fourteen episodes, the team ended up caught (and consequently have the run end) by the three Temple Guards. |
||
| − | * In Season One, the hidden half-pendant is often visible at the silver monkey's base in the Shrine of the Silver Monkey, but one notable episode where it is visibly hidden elsewhere (and the only episode where Kirk announce that the player picks it up) is "[[The Treasure of Anne Bonny]]" (Season 1, Layout 9). |
||
| − | * In only twelve episodes, the team ended up caught (and consequently have the run end) by the three Temple Guards. |
||
* Despite being armed with only one pendant, six teams managed to get past the Temple Guards for the win. |
* Despite being armed with only one pendant, six teams managed to get past the Temple Guards for the win. |
||
| − | * In both the "[[The Golden Cricket Cage of Khan|Golden Cricket Cage of Khan]]" ( |
+ | * In both the "[[The Golden Cricket Cage of Khan|Golden Cricket Cage of Khan]]" (Episode 4) and "Elizabeth I's Golden Ship" (Episode 5), the teams had traversed only four rooms. Time expired in the "Golden Cricket Cage of Khan," and the team was caught by the three Temple Guards in "Elizabeth I's Golden Ship." |
| − | * In three episodes did a player enter all twelve rooms of that particular layout. Of these, the two wins were in "[[The Diary of Doctor Livingstone]]" and "[[The Metal Beard of the Egyptian Queen]]" ( |
+ | * In three episodes did a player enter all twelve rooms of that particular layout. Of these, the two wins were in "[[The Diary of Doctor Livingstone]]" and "[[The Metal Beard of the Egyptian Queen]]" (Episode 109). |
* In all three seasons, not one artifact had ever been taken out of the temple in the bottom room of the center shaft. |
* In all three seasons, not one artifact had ever been taken out of the temple in the bottom room of the center shaft. |
||
| − | * In "[[The Jeweled Necklace of Montezuma]]" ( |
+ | * In "[[The Jeweled Necklace of Montezuma]]" (Episode 62), Kelly dropped the middle part of the Silver Monkey over the railing and onto the studio floor. A Temple Guard spirit (really a cameraman) threw it back up to her, but she wasn't able to complete the statue in time. This occurred again in "[[The Upside-Down Compass of Henry Hudson]]" (Episode 90). However, unlike the Jewled Necklace episode, when Derek dropped the middle piece over the railing, time expired just as it started falling. |
| − | * In "[[The War Fan of the 47 Ronin]]" ( |
+ | * In "[[The War Fan of the 47 Ronin]]" (Episode 83) the door from the Pit of the Pendulum to the Tomb of the Headless Kings was accidentally smacked shut by the frontrunner, Jeremy. This prevented the secondrunner, Elise from entering the room for about 30 seconds. As compensation, the producers gave the team the second prize because they otherwise would have made it to the artifact. |
| − | * The closest failed escape run was the "[[The Broken Wing of Icarus|Broken Wing of Icarus]]" ( |
+ | * The closest failed escape run was the "[[The Broken Wing of Icarus|Broken Wing of Icarus]]" (Episode 78). Jason grabbed the wing with less than a minute. However, instead of swinging across in The Pit, he jumped down and went to The Ledges. Time expired when Jason was behind Olmec. |
* In Season Three, three episodes had an instance where the player got into the artifact room, but failed to grab the artifact itself in time. Those are "[[The Red Sash of Tokugawa Ieyasu]]" and "[[The Pearl Necklace of Gwalior]]" and "[[The Dried Ear Corn of Soujourner Truth]]." |
* In Season Three, three episodes had an instance where the player got into the artifact room, but failed to grab the artifact itself in time. Those are "[[The Red Sash of Tokugawa Ieyasu]]" and "[[The Pearl Necklace of Gwalior]]" and "[[The Dried Ear Corn of Soujourner Truth]]." |
||
| − | * The Jester's Court did not turn off the lights in two episodes. These are "[[The Golden Pepperoni of Catherine de Medici]]" ( |
+ | * The Jester's Court did not turn off the lights in two episodes. These are "[[The Golden Pepperoni of Catherine de Medici]]" (Episode 73) and "[[The Enormous Feather of Me Linh]]" (Episode 104). |
* In [[The Lucky Pot-Bellied Pig of Amelia Earhart]], Kristin was taking out of the temple by a temple guard in The Swamp with 3 seconds left leaving no time for partner [[Scott McCaskell]]. Time expired as Scott was about to enter the temple. |
* In [[The Lucky Pot-Bellied Pig of Amelia Earhart]], Kristin was taking out of the temple by a temple guard in The Swamp with 3 seconds left leaving no time for partner [[Scott McCaskell]]. Time expired as Scott was about to enter the temple. |
||
| − | * In Season Two, the player progressed in the temple despite having a half-pendant, namely "[[The Missing Eye of David]]" ( |
+ | * In Season Two, the player progressed in the temple despite having a half-pendant, namely "[[The Missing Eye of David]]" (Season 2, Episode 16) and "[[The Golden Pepperoni of Catherine de' Medici]]." |
| − | * In two episodes of Season Two ( |
+ | * In two episodes of Season Two (Season 2, Episode 33), Kirk referred the Room of the Mandarin Hand as Medusa's Lair. These are "The Golden Pepperoni of Catherine de Medici" and "[[The Levitating Dog Leash of Nostradamus]]." |
* "The Golden Pepperoni of Catherine de Medici" is the only episode where the player passes up the artifact. |
* "The Golden Pepperoni of Catherine de Medici" is the only episode where the player passes up the artifact. |
||
* The longest Temple Run ended due to Triple Seizure was "[[The Lost Taj Mahal Turban of Aurangzeb]]." The player was caught in the Quicksand Bog with 0:11 left. |
* The longest Temple Run ended due to Triple Seizure was "[[The Lost Taj Mahal Turban of Aurangzeb]]." The player was caught in the Quicksand Bog with 0:11 left. |
||
* "[[The Lost Love Letter of Captain John Smith]]" was the only episode where the player ended the run in The Shrine of the Silver Monkey due to Triple Seizure (in "[[The Silver Cannonball of Grandy Nanny]]," the team had two pendants. Amber had a full pendant upon capture (see below)) |
* "[[The Lost Love Letter of Captain John Smith]]" was the only episode where the player ended the run in The Shrine of the Silver Monkey due to Triple Seizure (in "[[The Silver Cannonball of Grandy Nanny]]," the team had two pendants. Amber had a full pendant upon capture (see below)) |
||
| − | * The only episode where the player ran out of time and captured by a Temple Guard at the same time was "The Silver Cannonball of Grandy Nanny." |
+ | * The only episode where the player ran out of time and captured by a Temple Guard at the same time was "The Silver Cannonball of Grandy Nanny." However, Amber had a full Pendant upon the encounter, and was escorted out due to time expired. |
* "[[The Crown of Queen Nzinga]]" was the only episode where the Temple run ended due to Triple Seizure in the Dark Forest, making that the only time a Temple Guard spirit in the right tree ended the run. It was one of the two episodes where the three Temple Guards (including the tree in the Dark Forest) protected three straight rooms, which were the Laser Light Room, the Swamp, and the Dark Forest |
* "[[The Crown of Queen Nzinga]]" was the only episode where the Temple run ended due to Triple Seizure in the Dark Forest, making that the only time a Temple Guard spirit in the right tree ended the run. It was one of the two episodes where the three Temple Guards (including the tree in the Dark Forest) protected three straight rooms, which were the Laser Light Room, the Swamp, and the Dark Forest |
||
| − | * In the episode "[[The Mummified Hand of the Egyptian King]]", Maggie was taken out of the Temple by the first guard because she lost possession of her Pendant in the Pit of the Pendulum, marking the only time that happened. |
+ | * In the episode "[[The Mummified Hand of the Egyptian King]]", Maggie was taken out of the Temple by the first guard because she lost possession of her Pendant in the Pit of the Pendulum, marking the only time that happened. Josh found the Pendant in the Pit, but ironically failed to find the other half to his own Pendant (located in the Chamber of the Sacred Markers on top of the left side of the markers). The run ended by Triple Seizure when he was caught in the Room of the Secret Password. |
* [[The Sacred Ring of Sultan Suleiman]] is the only episode where the Purple Parrots lost due to triple seizure. The Run ended in Medusa's Lair with 0:45 left. |
* [[The Sacred Ring of Sultan Suleiman]] is the only episode where the Purple Parrots lost due to triple seizure. The Run ended in Medusa's Lair with 0:45 left. |
||
===Network=== |
===Network=== |
||
| − | * |
+ | * ''Legends'' was the third-longest running Nickelodeon game show in terms of episodes produced. Only ''Double Dare'' and ''GUTS'' surpassed it (by considerable margins). |
| − | * The only regular Nickelodeon network in the world that has |
+ | * The only regular Nickelodeon network in the world that has ''Legends'' in its regular rotation is the Japanese version of Nick. |
===Other Information=== |
===Other Information=== |
||
| Line 845: | Line 557: | ||
==See also== |
==See also== |
||
| + | * ''[[Legends of the Hidden Temple (TV movie)|Legends of the Hidden Temple]]'' (TV movie) |
||
| − | * [[Nickelodeon GUTS]] |
||
| − | * [[ |
+ | * "[[Legends]]" |
| − | |||
| − | ==Additional Pages== |
||
| − | * [[Legends of the Hidden Temple episode list]] |
||
| − | * [http://gameshows.wikia.com/wiki/Legends_of_the_Hidden_Temple/Video_Gallery Legends of the Hidden Temple Video Gallery] |
||
==External links== |
==External links== |
||
| + | * {{Interwiki|gameshows|Game Shows Wiki}} |
||
* [http://www.ceruleantown.com/legends Legends of the Hidden Temple Image Gallery] - A fan site with over six hundred screenshots and drawn pictures from the show |
* [http://www.ceruleantown.com/legends Legends of the Hidden Temple Image Gallery] - A fan site with over six hundred screenshots and drawn pictures from the show |
||
* [http://web.archive.org/20051110035340/www.geocities.com/nicklegends/ The King's Storeroom] - A large fan site devoted to everything related to the show. Includes an episode list and an interactive game. |
* [http://web.archive.org/20051110035340/www.geocities.com/nicklegends/ The King's Storeroom] - A large fan site devoted to everything related to the show. Includes an episode list and an interactive game. |
||
* [http://static.episode39.it/character/7195.jpg?t=1312199028 Joshua Michaels' Father] - A rare image depicting the father of the eponymous star of the show |
* [http://static.episode39.it/character/7195.jpg?t=1312199028 Joshua Michaels' Father] - A rare image depicting the father of the eponymous star of the show |
||
| − | * [http://www.geocities.com/lotht2001 Lotht2001] - Includes many screenshots of the show, with information on some of the more notable temple runs |
||
* [http://legendsofthehiddentemple.piczo.com The Shrine of the Silver Monkey] - A fansite with much information on the show as well as a variety of additional resources |
* [http://legendsofthehiddentemple.piczo.com The Shrine of the Silver Monkey] - A fansite with much information on the show as well as a variety of additional resources |
||
* [http://www.piczo.com/legendsofthehiddentemple?g=13112402&cr=2 Nicholas Borey Interview (Henry VIII's Great Seal)] Interview with Nicholas Borey, a contestant that was on Legends. |
* [http://www.piczo.com/legendsofthehiddentemple?g=13112402&cr=2 Nicholas Borey Interview (Henry VIII's Great Seal)] Interview with Nicholas Borey, a contestant that was on Legends. |
||
| Line 862: | Line 570: | ||
* [http://www.zubazpants.com/articles/archive/mendola01.html Who the Crap is Olmec Anyway?] - An article with a play by play review of a riveting episode of Legends of the Hidden Temple. |
* [http://www.zubazpants.com/articles/archive/mendola01.html Who the Crap is Olmec Anyway?] - An article with a play by play review of a riveting episode of Legends of the Hidden Temple. |
||
* [http://phantomstemple.us.to/ Phantom's Temple] - A dedicated forum for ''Legends'' fans. |
* [http://phantomstemple.us.to/ Phantom's Temple] - A dedicated forum for ''Legends'' fans. |
||
| + | |||
| + | {{Legends of the Hidden Temple}} |
||
| + | {{Game shows}} |
||
| + | {{Italic title}} |
||
| + | [[Category:Legends of the Hidden Temple| ]] |
||
[[Category:Game shows]] |
[[Category:Game shows]] |
||
| − | [[Category: |
+ | [[Category:Cancelled shows]] |
| + | [[Category:1990s premieres]] |
||
Revision as of 12:29, 27 December 2019
This show has a wiki of its own: Legends of the Hidden Temple Wiki.
Legends of the Hidden Temple (sometimes abbreviated LOTHT) is an action-adventure game show for children. The show centers around a "temple" that is "filled with lost treasures protected by mysterious Mayan temple guards". Kirk Fogg hosts and serves as the teams' guide, while Dee Bradley Baker announced and voiced a talking audio-animatronic Olmec head, simply named Olmec, who "knows the secrets behind each of the treasures in his Temple". Six teams of two children, one boy and one girl, compete to retrieve one of the historical artifacts in the Temple by performing physical stunts and answering questions based on history, mythology, and geography. After three elimination rounds, only one team remains, who then earns the right to go through the Temple to retrieve the artifact within three minutes and win a grand prize.
Legends was produced by Stone Stanley Productions in association with Nickelodeon and was taped at Nickelodeon Studios at Universal Studios in Orlando, Florida. It aired from September 11, 1993 to November 24, 1995 in first-run and through August 23, 1998 in reruns. From 1999 to 2007, reruns of the show aired on Nick GAS. Since 2011, it has sporadically appeared on TeenNick's The '90s Are All That and NickSplat blocks. A made-for-TV movie based on the show aired in November 2016, and a fictional version of the show was also featured in The Loud House episode "Legends".
The main game
Teams
In each game, six teams of two members each competed in three rounds to get to the temple.
Each team was designated a color and animal, indicated on their uniform shirts:
")
")
")
")
")
")
The Green Monkeys, Red Jaguars, and Orange Iguanas were the only teams not to use the same sound twice. The color yellow was omitted because the symbols on the uniforms were already yellow (the Silver Snakes were supposed to be yellow).
Round 1: The Moat

Round 1
The first round of the show involved a stunt where the six teams had to get across a narrow swimming pool known as the "moat". And during the show's Nick Gas run the logo would be at the bottom right corner. Some of the commonly used methods included rafts, ropes, and bridges. All six teams attempted to get both members across according to the rules and punch a button, thus setting off the team's "gong". Typically, if a team member fell in the water, that partner (or occasionally both teammates) would have to go back and try again until they could get across. The first four teams to hit their gongs advanced to the second round.
Round 2: The Steps of Knowledge
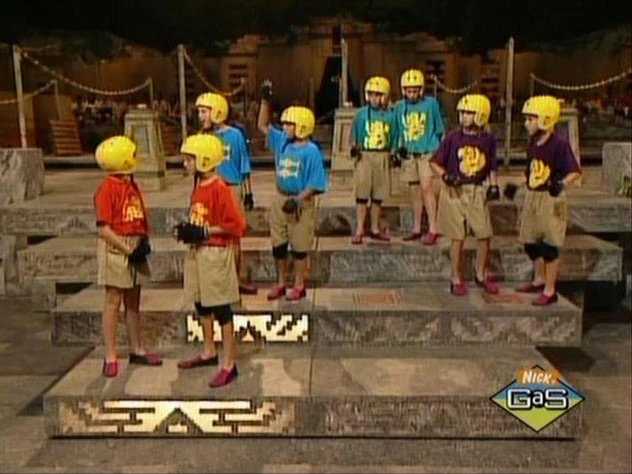
Round 2
Olmec begun the Steps of Knowledge by telling the remaining teams the episode's legend. After finishing, he asked the teams a series of questions to test their memories. A team that knew the answer buzzed in by hitting the button (known as an "ancient marking") on their step with their feet, and their staircase lights up so they can answer (if Olmec was still in the middle of asking the question, he would stop talking immediately). Each multiple-choice question had three possible answers. If the team answered correctly, they moved down to the next level. If a team answered incorrectly or went too long without an answer (three seconds after being called upon), the other teams would have a chance to answer. A question would be replaced if two of its three choices were eliminated by incorrect answers. The first two teams to step down to the bottom level by answering questions correctly moved on to the next round.
Round 3: The Temple Games
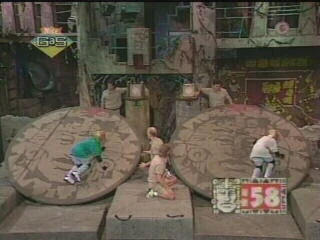
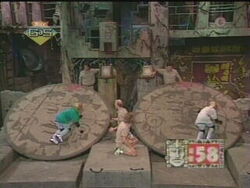
One of the temple games
The Temple Games round was introduced as a turning point in the episode away from the unpredictable Moat and mind games of the Steps of Knowledge, where "the glory [went] to the fastest and the strongest." Here, the two remaining teams, most likely the Red Jaguars, Green Monkeys, or Siver Snakes, competed for as many pendants of life as possible in three physical challenges. And the Nick Gas logo would be at the upper left corner The Temple Games employed on Legends were many and varied. The first season featured more of an emphasis on teams climbing and/or crossing ramps to retrieve objects, while hindered by bungee cords attached to them. Most times the ramps were covered with soap or water to make it more difficult. The second and third seasons introduced more physical activities such as climbing, riding moving or spinning objects, or spinning a giant wheel. Temple Game challenges were either untimed or lasted for a maximum of 60 seconds (ending either when time expired or when a team completed the objective). After each challenge, the winning team (the team who completed the objective first, or, failing that, the team who made the most progress) was awarded some portion of a protective Pendant of Life. The first two challenges, which pitted a single member of a team against another, awarded a half-pendant each, and the final challenge, involving both teams in whole, awarded a full pendant. If a Temple Game ended in a tie, both teams were awarded the pendant value of that game. After these rounds, the team with the greater number of pendants went on to the final round.
In the event that the two teams' pendant totals were tied after the three games, Fogg (or, later in seasons 2 and 3) Olmec asked a tiebreaker question to determine the winner. A "tiebreaker pedestal" was brought out, and the first team to hit the button on top of their gong earned the chance to answer the question. The team would have three seconds to answer, and their first response had to be accepted. A correct answer allowed the team to go to the Temple. In Season 1, an incorrect answer (or running out of time) automatically awarded the other team passage to the Temple, but in the second and third seasons, the other team simply received an opportunity to answer the question correctly.
Round 4: The Temple
In the final round, often known as the Temple Run, the winning team took whatever Pendants of Life they had (most commonly, a full pendant and half of the second) into the temple. The temple consisted of 12 to 13 rooms, depending on the layout, each connected by a doorway which may or may not have been open during the game, depending on the setup used that day. One room in the labyrinth had the themed artifact; three rooms held Temple Guards (spotters in lavish Mayan sentinel costumes). If the winning team had an incomplete pendant, the remaining half-pendant would be in a room as well. However, if the team had only one pendant going into the temple, there would be no hidden pendant. In that case, if the second player ran into a Guard, the game would end.
The winning team had three minutes to retrieve the artifact. One player was sent in first, with a complete pendant. The second player remained outside the Temple gate to watch the first player's progress. In each room, completing a puzzle or accomplishing a task would unlock a door to another room. For example, the Shrine of the Silver Monkey held three pieces of a silver monkey statue, and completing the statue would unlock a door. The Jester's Court had buttons placed along the walls outlining images of two court jesters and one king. One of these sets of 3 buttons opened a door to an adjacent room; posing in the position of the correct outline and pressing the buttons opened the door.
When a player encountered one Guard, the player was forced to give up a full pendant in order to continue or if caught without a pendant be taken out of the temple. The second player now had the chance to enter, with all opened doors remaining open and all known Temple Guards nonexistent. If the second player possessed only half a Pendant of Life, a Temple Guard could catch him or her and end the game. To prevent that, the second player would also have to find the other half of the pendant which was hidden in the temple. It was often well-hidden and only a few contestants have found one during their run.
If either player reached the artifact (being defined as actually grabbing onto the artifact, instead of merely being in the same room with it), all remaining Guards "vanished" and all locked doors instantly opened, allowing the player to escape unhindered. Just for getting into the temple, the team automatically won a prize. If they picked up the artifact, they also would win another prize of slightly higher value. If they escaped with the artifact before time ran out, the team won a vacation (sometimes to another country), or a week at NASA's Space Camp, in addition to the two merchandise prizes. (Although not disclosed in the show, each individual winning contestant would receive two travel vouchers. Destinations varied greatly—some were within the state of Florida, while others could be in the Caribbean or Mexico. Unlike previous Nick game shows, Legends never deviated from offering a travel prize as the grand prize.)
One interesting note is the portrayal of the Temple Run. During the first season, the Temple Run would take place with only background music similar to 8-bit NES music and the clock. In the second and third seasons, the same music would play in the background, while the display included both a map and a count of the number of pendants the team had. This gave the Temple Run a feel somewhat similar to a live-action video game.
Team Statistics
| Team | Red Jaguars | Blue Barracudas | Green Monkeys | Orange Iguanas | Purple Parrots | Silver Snakes |
|---|---|---|---|---|---|---|
| Moat Wins | 33 | 30 | 24 | 21 | 21 | 31 |
| Moat Losses | 7 | 10 | 16 | 19 | 19 | 9 |
| Steps of Knowledge Wins | 18 | 16 | 9 | 9 | 9 | 19 |
| Steps of Knowledge Losses | 15 | 14 | 15 | 12 | 12 | 12 |
| Temple Game Wins | 30 | 26 | 16 | 19 | 14 | 36 |
| Temple Game Losses | 24 | 22 | 11 | 8 | 13 | 21 |
| Pendants Earned | 21 | 16.5 | 10 | 13 | 9 | 25 |
| Tiebreakers Wins/Losses | 1-3 | 2-0 | 0 | 0 | 0-1 | 2-1 |
| Went to the Temple | 10 | 7 | 4 | 6 | 2 | 11 |
| Wins | 2 | 3 | 2 | 0 | 0 | 5 |
| Losses | 8 | 4 | 2 | 6 | 2 | 6 |
| Temple Guards Encountered | 20 | 14 | 9 | 13 | 4 | 24 |
| Team | Red Jaguars | Blue Barracudas | Green Monkeys | Orange Iguanas | Purple Parrots | Silver Snakes |
|---|---|---|---|---|---|---|
| Moat Wins | 27 | 25 | 33 | 21 | 25 | 29 |
| Moat Losses | 13 | 15 | 7 | 19 | 15 | 11 |
| Steps of Knowledge Wins | 10 | 14 | 14 | 15 | 17 | 10 |
| Steps of Knowledge Losses | 17 | 11 | 19 | 6 | 8 | 19 |
| Temple Game Wins | 16 | 25 | 20 | 31 | 32 | 14 |
| Temple Game Losses | 14 | 17 | 22 | 14 | 19 | 16 |
| Pendants Earned | 12 | 15 | 13 | 21 | 21 | 9.5 |
| Tiebreakers Wins/Losses | 2-1 | 2-0 | 2-1 | 3-2 | 0-5 | 1-1 |
| Went to the Temple | 6 | 7 | 5 | 10 | 7 | 5 |
| Wins | 0 | 2 | 2 | 3 | 2 | 1 |
| Losses | 6 | 5 | 3 | 7 | 5 | 4 |
| Temple Guards Encountered | 16 | 16 | 8 | 22 | 16 | 11 |
| Team | Red Jaguars | Blue Barracudas | Green Monkeys | Orange Iguanas | Purple Parrots | Silver Snakes |
|---|---|---|---|---|---|---|
| Moat Wins | 30 | 21 | 31 | 26 | 24 | 28 |
| Moat Losses | 10 | 19 | 9 | 14 | 16 | 12 |
| Steps of Knowledge Wins | 12 | 7 | 25 | 13 | 12 | 11 |
| Steps of Knowledge Losses | 18 | 14 | 6 | 13 | 12 | 17 |
| Temple Game Wins | 19 | 18 | 48 | 25 | 14 | 18 |
| Temple Game Losses | 17 | 3 | 27 | 14 | 22 | 15 |
| Pendants Earned | 13 | 12.5 | 33 | 17 | 9.5 | 10 |
| Tiebreakers Wins/Losses | 0-2 | 0-1 | 3-2 | 3-1 | 1-2 | 2-1 |
| Went to the Temple | 4 | 5 | 15 | 9 | 2 | 5 |
| Wins | 2 | 0 | 4 | 1 | 1 | 2 |
| Losses | 2 | 5 | 11 | 8 | 1 | 3 |
| Temple Guards Encountered | 8 | 13 | 34 | 18 | 5 | 8 |
| Team | Red Jaguars | Blue Barracudas | Green Monkeys | Orange Iguanas | Purple Parrots | Silver Snakes |
|---|---|---|---|---|---|---|
| Moat Wins | 90 | 76 | 88 | 68 | 70 | 88 |
| Moat Losses | 30 | 44 | 32 | 52 | 50 | 32 |
| Steps of Knowledge Wins | 40 | 37 | 48 | 37 | 38 | 40 |
| Steps of Knowledge Losses | 50 | 39 | 40 | 31 | 32 | 48 |
| Temple Game Wins | 65 | 69 | 84 | 75 | 60 | 68 |
| Temple Game Losses | 55 | 42 | 60 | 36 | 54 | 52 |
| Pendants Earned | 46 | 44.5 | 56 | 51 | 39.5 | 45 |
| Tiebreaker Wins/Losses | 3-5 | 2-1 | 5-3 | 6-3 | 1-7 | 5-3 |
| Went to the Temple | 20 | 19 | 24 | 25 | 11 | 21 |
| Wins | 4 | 5 | 8 | 4 | 3 | 8 |
| Losses | 16 | 14 | 16 | 21 | 8 | 13 |
| Temple Guards Encountered | 44 | 43 | 51 | 59 | 25 | 43 |
Trivia
Behind the Scenes
- The show was taped in Soundstage 18 of Nickelodeon Studios at Universal Studios in Orlando, Florida. This soundstage is immediately stage-right of the classic "Nickelodeon" building shown at the conclusion of each episode.
- The hours of taping each day ranged from around 7:00 a.m. to midnight, although those times altered between taping days.
- Some of the show's Temple Runs in Season 3 were taped without an audience. This was because usually six episodes were taped a day, and all segments were done at once. That is, all moat rounds were taped, then all Steps of Knowledge rounds, then all Temple Games, then all Temple Runs. Players usually waited two hours between taping a round for their episode. The reason for no audiences, however, was because the Universal Theme Park (where the show was taped) had closed, and the audience members had been sent home.
- Other than in Season 3, other Legends episodes have been recorded without an audience. Two known episodes that had a Temple Run without an audience are "The Milk Bucket of Freydís" and "Galileo's Cannonball."
- Dee Bradley Baker, voice of Olmec, was also the announcer for the show.
Teams
- The Green Monkeys and the Silver Snakes share the record for most temple completions over the show's three seasons, both managing eight. Yet, out of the number of times going into the Temple, the Green Monkeys had a slightly better percentage (24-21). However, the Silver Snakes had the fastest contestants on the show.
- In a points system orchestrated by a fan, an entrance to the temple was worth one point, and a temple victory was worth three points. The Green Monkeys were first with 48 points; the Silver Snakes were second with 45 points; the Orange Iguanas were third with 37 points; the Blue Barracudas were fourth with 34 points; the Red Jaguars were fifth with 32 points. Last place belongs to the Purple Parrots with 20 points.
- In Season One, the contestants wore colored T-shirts tucked into khaki shorts for all rounds except the Temple Run, where they changed into T-shirts tucked into yellow sweatpants. In Seasons Two and Three, the contestants wore colored T-shirts with khaki shorts for the moat crossing and Steps of Knowledge but changed into blue jeans for the Temple Games and Temple Run. Also, the helmet color changed from yellow to gold.
Temple Rooms
- The first season's temple featured nine different layouts, as rooms changed almost each day of taping; the second season's temple featured five different layouts. Only Season Three's temple never changed layouts.
- The only room in the temple that was featured in all 120 episodes was the Shrine of the Silver Monkey.
- There were over 45 different rooms that were featured across the show's 120-episode span.
- Not all actuators in the temple, when hit, would open doors. As temple layouts changed, many were removed from the temple or made completely inactive. This is made obvious with the corner doors between the Swamp area and the Ancient Warriors area (the areas directly right of the Shrine of the Silver Monkey and Tomb of the Ancient Kings/Dark Forest); despite their actuators being completely inactive for most of the series (and left with no way to traverse through them, besides), they were still opened with the other doors after a team grabbed the day's artifact.
- The only two episodes where the stone wall connecting the two south-westernmost rooms could not be broken were "The Keys to the Alhambra" (Episode 8) and "The Imperial Purple Robe of Empress Theodora" (Episode 49).
- One room, The King's Storeroom, was featured at two different locations in the series. In Season Two, it was located above the Swamp/Jester's Court. In Season Three, it was moved to the Observatory.
Temple Runs
- Three seasons of the show aired, and 120 episodes were produced. Of those 120 episodes, only 33 episodes featured teams successfully getting out of the temple with the artifact. Seventeen episodes featured a player grabbing the artifact with time remaining but running out of time before he or she could actually bring the artifact out of the Temple, making for a total of 50 episodes in which the artifact was actually snatched up.
- The fastest completion of the Temple Run was in "The Mask of Shaka Zulu" (Episode 28). The player completed the temple in 1:46, without the help of his partner. However, this was arguably the easiest temple design; the player encountered no locked doors. This was due to a production error—the door leading from The Holes of Python to the Tomb of the Ancient Kings (where the artifact was located) was supposed to be locked. If you exclude that run the fastest completion was in "The Ivory Hunting Horn of Roland" (Episode 101) completed in 1:49.
- The quickest loss happened just 1:32 into the run in "Elizabeth I's Golden Ship" (Episode 5). The concentration of temple guards in the three rooms the team entered prevented them from going further.
- Four temple runs were completed with a single second left on the clock.
- The closest failed acquisition of an artifact was in "The Dragon Lady and the Blue Pearl" (Episode 33). Secondrunner, Jennifer, in this run entered the artifact's room, The Holes of Python, with 10 seconds left, and scurried past the obstacles, only to fall a finger's length short of the Pearl.
- The closest wins were in "Galileo's Cannonball", "The Applewood Amulet of Emiliano Zapata." and the Milk Bucket of Fredyis" all three had one second left
- Three temple runs involved the player who entered the temple grabbing the artifact without encountering a single temple guard. These runs were from "The Enormous Iron Nose Ring of Babe the Ox" from Season Two, and "The Much-Heralded Helmet of Sir Gawain" and "The Broken Trident of Poseidon," both from Season Three. However, only "The Enormous Iron Nose Ring" and "Much-Heralded Helmet" episodes ended with the player successfully getting out of the temple with the artifact. In the "Broken Trident" episode, the player, Kimberly, was startled by the noise of all the locked doors opening upon her grabbing the trident in the Shrine of the Silver Monkey, so she forgot she needed to get out of the temple carrying the object. Upon entering the Room of the Ancient Warriors, she put down the trident, and attempted to run out of the temple without it. Fogg then yelled for her to go back and get it. She went back to get it but went down into the Tomb of the Headless Kings through the Chamber of the Sacred Markers. Time ran out just as she entered the Ledges.
- The first solo run completion occurred in "The Star of Sultan Saladin" (Episode 7). Leah went from The Room of the Three Gargoyles to The Observatory and got out with 27 seconds left. Also, what is most widely noted is the Temple Guard in The Cave of Sighs that is spotted on the floor. Because she was on her way out of the Temple with the Star in hand, the Guard was rendered out of play. Many fans humorously commented on the Guard failing to disappear (literally).
- In the Temple Run of "Henry VIII's Great Seal" (Episode 14), one of the contestants, (the team's follow-up runner), was so startled by a temple guard's appearance that he literally ran out of the temple's cross-sectioned boundaries and onto the main studio floor. As many speculated that he was disqualified, the speculation was irrelevant considering he only possessed half of a Pendant upon encountering the Guard and was to be ejected from the temple, ending the run.
- In "The Pendant of Kamehameha" (Episode 11), the temple guard missed his cue in the Dungeon, allowing the second contestant to plow through the wall into the Tomb of the Ancient Kings, forcing the temple guard to follow the contestant into the Tomb to capture her.
- In Season One, the hidden half-pendant is often visible at the silver monkey's base in the Shrine of the Silver Monkey, but one notable episode where it is visibly hidden elsewhere (and the only episode where Kirk announced that the player picks it up in that season) is "The Treasure of Anne Bonny" (Episode 40).
- In only fourteen episodes, the team ended up caught (and consequently have the run end) by the three Temple Guards.
- Despite being armed with only one pendant, six teams managed to get past the Temple Guards for the win.
- In both the "Golden Cricket Cage of Khan" (Episode 4) and "Elizabeth I's Golden Ship" (Episode 5), the teams had traversed only four rooms. Time expired in the "Golden Cricket Cage of Khan," and the team was caught by the three Temple Guards in "Elizabeth I's Golden Ship."
- In three episodes did a player enter all twelve rooms of that particular layout. Of these, the two wins were in "The Diary of Doctor Livingstone" and "The Metal Beard of the Egyptian Queen" (Episode 109).
- In all three seasons, not one artifact had ever been taken out of the temple in the bottom room of the center shaft.
- In "The Jeweled Necklace of Montezuma" (Episode 62), Kelly dropped the middle part of the Silver Monkey over the railing and onto the studio floor. A Temple Guard spirit (really a cameraman) threw it back up to her, but she wasn't able to complete the statue in time. This occurred again in "The Upside-Down Compass of Henry Hudson" (Episode 90). However, unlike the Jewled Necklace episode, when Derek dropped the middle piece over the railing, time expired just as it started falling.
- In "The War Fan of the 47 Ronin" (Episode 83) the door from the Pit of the Pendulum to the Tomb of the Headless Kings was accidentally smacked shut by the frontrunner, Jeremy. This prevented the secondrunner, Elise from entering the room for about 30 seconds. As compensation, the producers gave the team the second prize because they otherwise would have made it to the artifact.
- The closest failed escape run was the "Broken Wing of Icarus" (Episode 78). Jason grabbed the wing with less than a minute. However, instead of swinging across in The Pit, he jumped down and went to The Ledges. Time expired when Jason was behind Olmec.
- In Season Three, three episodes had an instance where the player got into the artifact room, but failed to grab the artifact itself in time. Those are "The Red Sash of Tokugawa Ieyasu" and "The Pearl Necklace of Gwalior" and "The Dried Ear Corn of Soujourner Truth."
- The Jester's Court did not turn off the lights in two episodes. These are "The Golden Pepperoni of Catherine de Medici" (Episode 73) and "The Enormous Feather of Me Linh" (Episode 104).
- In The Lucky Pot-Bellied Pig of Amelia Earhart, Kristin was taking out of the temple by a temple guard in The Swamp with 3 seconds left leaving no time for partner Scott McCaskell. Time expired as Scott was about to enter the temple.
- In Season Two, the player progressed in the temple despite having a half-pendant, namely "The Missing Eye of David" (Season 2, Episode 16) and "The Golden Pepperoni of Catherine de' Medici."
- In two episodes of Season Two (Season 2, Episode 33), Kirk referred the Room of the Mandarin Hand as Medusa's Lair. These are "The Golden Pepperoni of Catherine de Medici" and "The Levitating Dog Leash of Nostradamus."
- "The Golden Pepperoni of Catherine de Medici" is the only episode where the player passes up the artifact.
- The longest Temple Run ended due to Triple Seizure was "The Lost Taj Mahal Turban of Aurangzeb." The player was caught in the Quicksand Bog with 0:11 left.
- "The Lost Love Letter of Captain John Smith" was the only episode where the player ended the run in The Shrine of the Silver Monkey due to Triple Seizure (in "The Silver Cannonball of Grandy Nanny," the team had two pendants. Amber had a full pendant upon capture (see below))
- The only episode where the player ran out of time and captured by a Temple Guard at the same time was "The Silver Cannonball of Grandy Nanny." However, Amber had a full Pendant upon the encounter, and was escorted out due to time expired.
- "The Crown of Queen Nzinga" was the only episode where the Temple run ended due to Triple Seizure in the Dark Forest, making that the only time a Temple Guard spirit in the right tree ended the run. It was one of the two episodes where the three Temple Guards (including the tree in the Dark Forest) protected three straight rooms, which were the Laser Light Room, the Swamp, and the Dark Forest
- In the episode "The Mummified Hand of the Egyptian King", Maggie was taken out of the Temple by the first guard because she lost possession of her Pendant in the Pit of the Pendulum, marking the only time that happened. Josh found the Pendant in the Pit, but ironically failed to find the other half to his own Pendant (located in the Chamber of the Sacred Markers on top of the left side of the markers). The run ended by Triple Seizure when he was caught in the Room of the Secret Password.
- The Sacred Ring of Sultan Suleiman is the only episode where the Purple Parrots lost due to triple seizure. The Run ended in Medusa's Lair with 0:45 left.
Network
- Legends was the third-longest running Nickelodeon game show in terms of episodes produced. Only Double Dare and GUTS surpassed it (by considerable margins).
- The only regular Nickelodeon network in the world that has Legends in its regular rotation is the Japanese version of Nick.
Other Information
- Despite being labeled as "the dreaded temple guards", occasionally the guards assisted the teams during the temple runs, such as the Galileo's Cannonball episode.
See also
- Legends of the Hidden Temple (TV movie)
- "Legends"
External links
- Game Shows Wiki: Legends of the Hidden Temple
- Legends of the Hidden Temple Image Gallery - A fan site with over six hundred screenshots and drawn pictures from the show
- The King's Storeroom - A large fan site devoted to everything related to the show. Includes an episode list and an interactive game.
- Joshua Michaels' Father - A rare image depicting the father of the eponymous star of the show
- The Shrine of the Silver Monkey - A fansite with much information on the show as well as a variety of additional resources
- Nicholas Borey Interview (Henry VIII's Great Seal) Interview with Nicholas Borey, a contestant that was on Legends.
- Zac Turney Interview (The Secret Map of the Bandit Queen) Interview with Zac Turney, another contestant that was on Legends.
- Who the Crap is Olmec Anyway? - An article with a play by play review of a riveting episode of Legends of the Hidden Temple.
- Phantom's Temple - A dedicated forum for Legends fans.
| Legends of the Hidden Temple | |
|---|---|
| Media | Game show (Episode list) • Movie • Tabletop game • Loud House crossover |
| Hosts | Kirk Fogg • Olmec |
| Teams | Red Jaguars • Blue Barracudas • Green Monkeys • Orange Iguanas • Purple Parrots • Silver Snakes |
| Other | Olmec's Temple • Temple Guards |
| Nickelodeon Games and Sports | |
|---|---|
| Double Dare • Finders Keepers • Total Panic • Think Fast • Make the Grade • Wild & Crazy Kids • Get the Picture • What Would You Do? • Nick Arcade • GUTS • Legends of the Hidden Temple • Figure It Out • You're On! • Sponk! • Robot Wars • Scaredy Camp • My Family's Got GUTS • BrainSurge • Webheads • Paradise Run • Keep It Spotless • Are You Smarter than a 5th Grader? • The Crystal Maze • Unfiltered • Unleashed • Tooned In | |